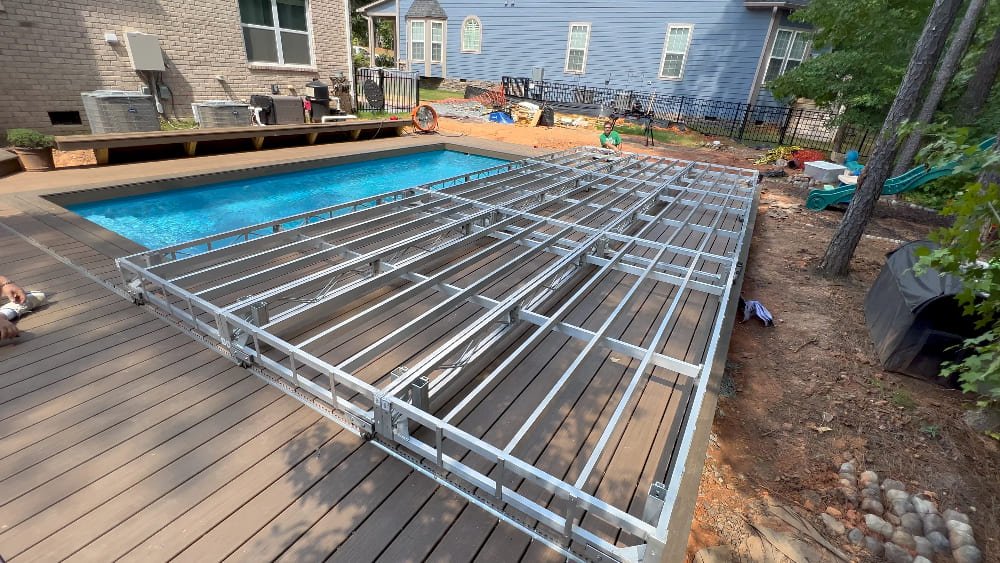
What if you had a backyard pool that turns into a chic deck with a click of a hand?
A sliding deck pool cover is a game changer – it’s safe, elegant and space saving at the same time. While, the thought of building one yourself might be daunting, but we assure you it’s much easier than you think.
Whether you’re an experienced DIYer or a person who simply enjoys a good project, this guide will bring you through the process step by step. So, Rolling up your sleeves? Let’s dive in!
Why You Should Build a Sliding Deck Pool Cover?
Before we jump into the nitty gritty, let’s discuss why you would want to take this project in the first place. Sliding deck pool covers are not just functional, they’re a statement piece. Here’s what you gain:
Safety: It can keep your kids and pets safe, when the pool isn’t in use.
Space Optimization: You can turn your pool area into a usable deck for lounging, dining or parties.
Energy Efficiency: It helps insulate the pool by lowering heat and water loss.
Cost Savings: When opposed to paying professionals, doing it yourself saves you thousands of dollars.
Lastly for all DIY people like us, It’s always a nice feeling to say, “Yeah, I built that myself.”
What You’ll Need:
Remember, it saves time and it avoids frustration if you have everything ready before you start. I bet there’s nothing worse than mid project hardware store runs.
Tools:
- Circular saw
- Drill and drill bits
- Measuring tape
- Spirit level
- Wrenches
- Screwdrivers
- Electric sander or sanding block.
Materials:
- Pressure-treated wood (for the frame and decking boards)
- Steel or aluminum rails and rollers
- Galvanized screws and bolts
- Paint or stain that is weather resistant
- Metal or wood support beams (depending on your pool’s dimensions)
- Brackets and hinges
Step-by-Step Guide

Step 1: Measure Your Pool
This first step is crucial. Take your measuring tape and write down the length, width and any extra space you’d like your sliding deck to cover. Also, don’t forget to take the railings on either side into consideration.
Make sure you double check your measurements to avoid any costly mistakes. “Measure twice, cut once” is a cliché, but it’s a lifesaver here!
Step 2: Plan Your Deck Frame
When you have your measurements in hand, sketch out the deck frame. The sliding mechanism and decking boards will be supported by the frame which will become the skeleton of the frame. Nevertheless, be sure to use pressure treated wood for longevity.
Next, determine if you want a single panel cover or bi-fold system. Also, plan spacing between joists (usually 12 to 16 inches apart). Lastly, include space for the rails to run smoothly along the sides.
A little creativity here, imagine how the finished product will look and function. Will it slide off to one side entirely or split in two sections? It’s all up to you.
Step 3: Install the Rails
Now, It’s time to lay the foundation for the sliding mechanism.
1. Attach the Rails: Fix steel or aluminum rails on both sides of the pool and be sure they are perfectly aligned.
2. Secure the Rollers: Attach rollers on the underside of your deck frame. These will glide along the rails smoothly.
Check that the rails are perfectly straight with the use of a spirit level. If the rails are misaligned, you’ll get a clunky, frustrating sliding experience, and nobody wants that.
Step 4: Build the Frame
Cut your pressure treated wood to your design plan and assemble the frame.
Start with the outer edges and work your way in. Next, the joints should be secured with use of brackets and galvanized screws. Support beams should be added underneath for more stability.
This part is tedious, but the sturdier your frame, the longer your sliding deck will last. It’s like laying the foundation of a house, it has to be rock solid.
Step 5: Attach the Decking Boards
And here comes the fun part: make it look good! Lay your decking boards down over your frame and leave a small gap in between each deck board for drainage..
Use galvanized screws to secure each board. Rough edges should be sand down to prevent splinters. Lastly, make sure to protect against the elements with a weather resistant paint or stain.
Don’t rush this step. A beautifully finished sliding deck will make your efforts worth it.
Step 6: Test the Sliding Mechanism
Test the sliding mechanism before you celebrate your victory. Does the deck glide along smoothly on the rails? Otherwise adjust the rollers or tighten the screws. This step will need a little patience, but it’s better to do it now than have to fix it later.
A tip from us: Spray the rails with a silicone based spray to get smooth sliding.
Step 7: Finishing Touches
When everything is working perfectly, it’s time to add those little extras that make your sliding deck pool cover truly yours.
You can try adding extra safety features like locks or stoppers to prevent accidental movement. If you are more creative, you could add planters, outdoor furniture or LED lights for a little more vibe. On the flip side, if you are still worried about its longevity, apply a waterproof sealant to protect it against the effect of weather.
Safety Considerations
- Use appropriate safety equipment always.
- Have a helper when things get complicated during installation.
- Check local building codes
- If you’re not sure, consider professional consultation.
Things to Keep in Mind
1. Budget: A DIY sliding deck pool cover can be inexpensive, but there are unexpected expenses. Plan for a little wiggle room.
2. Time: This is likely going to be a long project that may take several weeks, especially if you’re doing it solo.
3. Help: Don’t be shy to rope in a friend or a family member. Two hands are good, four are even better! It’s okay to ask for help when you need it.
Final Thoughts
A sliding deck pool cover is a lot more than a DIY project; it’s an investment in your home and your lifestyle. It will not only make your backyard more functional, but it will also make you feel good every time you slide it open or close. It takes work, patience, and a little elbow grease, but it’s all worth it.
So, what are you waiting for? You need to gather your tools, become your own carpenter, and then start building your dream deck. Don’t forget to share your success story too, because there’s nothing like the feeling of saying, ‘I built this!’


