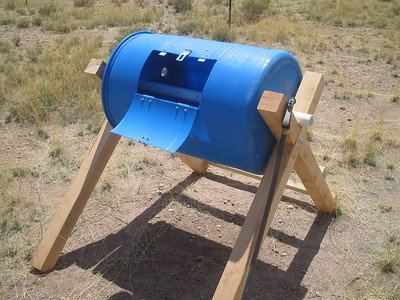
Picture this: you’re peeling veggies in the kitchen, tossing the scraps in the trash, and thinking, There has to be a better use for this stuff, right? You’re not alone. One of those magical processes that turns garbage into something golden is composting. Let’s be real, nobody has time to stand in the yard with a pitchfork turning a pile of rotting scraps. Enter the rotating compost bin: It’s a cleaner, faster, and oddly satisfying solution.
If you are ready to save kitchen scraps, reduce waste, and feel like an eco warrior in your own backyard, let’s get into how to build one yourself.
Why Make a Rotating Compost Bin?

Let’s start with the obvious question: why make a compost bin that turns? Why couldn’t you just go with a basic compost pile or a store bought bin? Sure, but here’s the thing:
- No Pitchfork Required: Forget turning a compost pile yourself. Spin the barrel, and boom – your scraps are mixed, aerated and on their way to compost heaven.
- Speedy Results: Traditional piles can take forever to break down. A rotating bin on the other hand gets the job done in weeks. It’s like upgrading from dial up to fiber internet.
- Neat and Tidy: No smelly heap in your yard. This baby is way less gross and self contained.
But for many of us, the biggest win? It’s like a little science experiment happening in our backyards. We feel a spark of pride every time we give the barrel a spin. We look at ourselves, turning trash into treasure.
Now that we’ve convinced you (hopefully), let’s dig into the nitty-gritty of building your very own rotating compost bin.
What You’ll Need
Before you start construction, get these materials. You don’t need anything too fancy—just items that are readily available at hardware stores or even lying around your home:
1. A Barrel or Drum: This is the heart of your bin. Who knows, you can stumble upon a 50 gallon food grade plastic barrel on a local marketplace for cheap. Look for something sturdy, but light enough to spin.
2. A Sturdy Frame: Whether it’s wood, metal, or PVC, your frame has to hold the barrel securely while allowing it to rotate.
3. Metal Rod or Pipe: This will act as the axle. Bonus, if it’s already collecting dust in your garage.
4. Hinges and a Latch: To make a door so that you can add scraps and retrieve compost.
5. Drill and screws: Required for drilling and for securing components.
6. Ventilation materials: For the Airflow, you can make use of a mesh or screen.
Optional: Paint – If you want to make it look pretty or to blend it with your backyard decor.
Step-by-Step Instructions
1. Prepare the Barrel
Start with your barrel, as it is the star of the show. If it has already held any chemicals, wash it thoroughly. Safety first! Draw a rectangle on the side of the barrel with a marker. This will be your door for adding scraps and removing compost. Using a jigsaw or similar tool cut out the rectangle. Make sure it’s large enough to comfortably add waste but not so large that the structure weakens.
2. Add Ventilation Holes
Airflow is needed in composting to keep the microbes happy and prevent odors. Drill small holes around the barrel, about 6 inches apart. These should be no bigger than ½ inch in diameter to keep critters out. For extra ventilation, you can attach a fine mesh over the holes using adhesive or screws.
3. Install the Door
Reattach the rectangle you cut out earlier to act as a door. The one side is secured with hinges, and the other with a latch to keep it closed. Make sure it’s snug enough or it’ll leak, but also make sure you can get it open when needed.
4. Create the Frame
This is what keeps the entire structure together and allows your bin to rotate. Use treated wood or metal. Construct a basic rectangular frame that will hold the barrel (actually with a full barrel). Put a rod or pipe through the center of the frame horizontally. This will serve as the axle.
5. Mount the Barrel
Slide the metal rod or pipe through the barrel and make sure it’s perfectly balanced. Attach the ends of the rod to the frame using screws, bolts, or brackets. Make sure the barrel rotates freely but doesn’t wobble. In some cases, the barrel will appear uneven, in which case you may want to add additional supports or balance weights.
6. Optional Touches
Paint it! A dark color – such as black or green – will speed up the composting process because it will help absorb heat. Personalise it with fun signs like Garden Gold Maker or Compost Magic or label it in more straightforward terms like “ Wormery ”: it all depends on you!
Using Your Rotating Compost Bin:
Building it is just half the journey—now comes the fun part: using it! Here’s how to maximize your composting success:
1. Layer It Like a Lasagna: Compost needs a mix of nitrogen-rich (green) and carbon-rich (brown) materials. For greens, think veggie scraps, coffee grounds, and grass clippings; For browns its leaves, cardboard, and twigs. Start with some browns (leaves, shredded paper) as a base, then followed by adding greens (kitchen scraps, grass clippings). Aim for a 2:1 ratio of browns to greens.
2. Don’t Overload: A full bin can be hard to rotate, and it may not compost well. For the best results, fill it about ⅔ full.
3. Give It a Spin: Turn the barrel every 2-3 days to keep things aerated. It’s soulfully satisfying, like stirring soup, but way less messy.
4. Monitor Moisture: Compost should feel like a damp sponge. Too dry? Add water. Too wet? Toss in more browns.
Why DIY?
Could you simply purchase a rotating compost bin? Sure. But where’s the fun in that? Building your own rotating compost bin is cheaper, you can customize it to your needs, and you’re repurposing materials to reduce waste. It’s also a conversation starter!
Imagine your neighbor asking, “What’s that?” and you are proudly replying, “Oh, just my homemade compost bin. No big deal.” Mic drop.
Final Thoughts
A rotating compost bin isn’t just a project, it’s a step toward sustainable living. It’s a nudge to remember that little steps like composting your food waste can have a big footprint on the planet.
So what are you waiting for? Get some tools, channel your inner MacGyver, and get started. Your garden (and the Earth) will thank you. And who knows? You might just inspire someone else to do the same.


