

Have you ever dreamed of turning your dim, underutilized basement into a vibrant, sunlit space that connects seamlessly to your backyard? Adding a walkout basement door can do just that. It’s a project that offers incredible rewards—increased natural light, improved accessibility, and even boosted home value.
But let’s face it, installing a walkout basement door is not for the faint of heart. It’s a project that demands time, patience, and a willingness to roll up your sleeves. But fear not! I’m here to guide you through every step of this transformative journey. Let’s dive in and explore this exciting home improvement project in exquisite detail.
Step 1: Dream Big, Plan Bigger
Before you even think about picking up a shovel, grab a notebook and start planning. This is your moment to envision how the walkout door will integrate with your basement—both functionally and aesthetically. Will it lead to a cozy patio? A garden oasis? A practical entryway? Picture the sunlight streaming in, the smooth transition from indoors to outdoors, and the newfound utility of your basement space. Your vision will guide all your decisions, from the type of door to the landscaping around it.
But dreams need a reality check. Start by consulting local building codes. You’ll likely need a permit for this project, and codes often dictate door dimensions, egress requirements, and placement. It’s also wise to call a utility locator service to ensure you’re not digging into gas or water lines. Trust me, nothing kills a project’s momentum faster than accidentally hitting a utility line. Additionally, take a moment to consider your budget. Make a list of expected costs, including tools, materials, and professional help if needed.
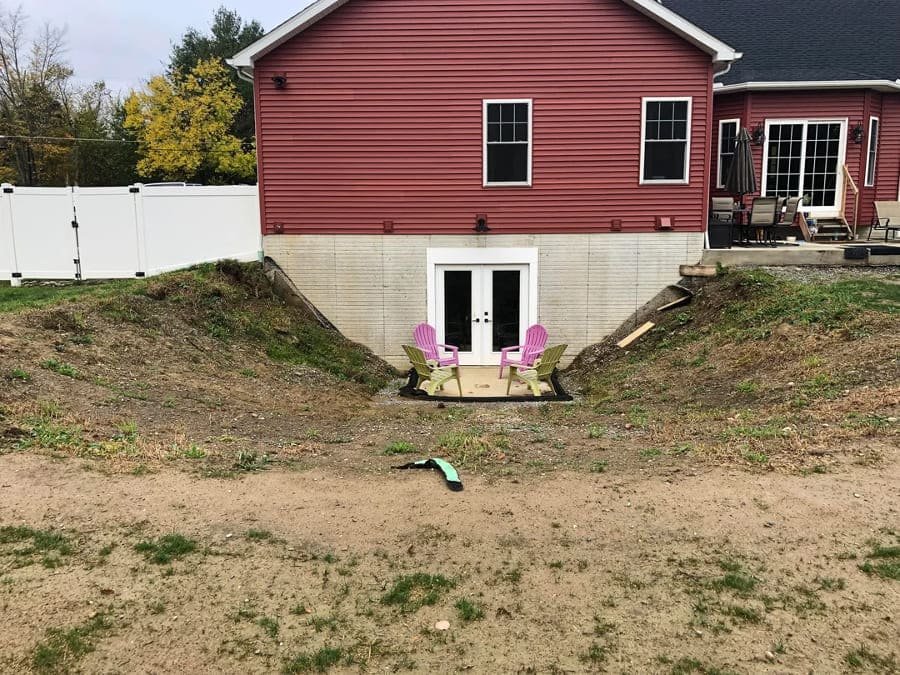
Step 2: Scout the Perfect Spot
Choosing the right location for your walkout door is crucial. Ideally, it should be on a wall that offers easy access to the outdoors with minimal excavation. Consider the slope of your yard—a natural incline can save you a lot of digging. Also, think about sunlight. A south-facing door can flood your basement with warm, natural light, transforming it from a shadowy storage area into a lively, welcoming space.
While you’re scouting, take note of drainage. Water is your enemy here, and poor drainage can turn your dream door into a nightmare of leaks and flooding. Plan to install a proper drainage system—think gravel beds, French drains, or even a sump pump if needed. Take the time to observe your yard during heavy rainfall to identify potential problem areas. This foresight will save you headaches down the road.
Step 3: Gather Your Tools and Team
This isn’t a one-person job. You’ll need a mix of tools and hands to help. Here’s a starter list:
- Tools: Reciprocating saw, sledgehammer, concrete saw, shovels, level, wheelbarrow, protective gear (goggles, gloves, etc.), and a tape measure.
- Materials: Concrete mix, wood framing, waterproofing membranes, gravel, sealants, weatherstripping, and your chosen door. Don’t forget finishing materials like trim and paint for the final touches.
- People: A friend or two for heavy lifting and maybe a contractor if you’re unsure about cutting through concrete. If you’re taking on this project as a DIY endeavor, having at least one experienced helper can make a huge difference.
Step 4: The Big Dig
Time to get your hands dirty! Excavate the area where your door will go. This involves digging a trench wide enough to work in and deep enough to reach your basement’s foundation. Depending on your yard’s terrain, this step might be as simple as shoveling soil or as complex as renting an excavator. Ensure that you have enough space to work comfortably, as a cramped trench can make the job much harder.
Pro tip: As you dig, set aside the topsoil to use later for landscaping. And keep an eye out for rocks—you’ll need a sledgehammer or jackhammer to break through anything particularly stubborn. Don’t rush this process; proper excavation sets the foundation for a successful installation.
Step 5: Cutting Through Concrete—The Moment of Truth
Now comes the part that makes most DIYers break a sweat: cutting through the foundation. Use a concrete saw to carefully cut an opening that matches your door’s dimensions. Take your time and measure twice. Mistakes here are hard to fix and can compromise the integrity of your foundation.
As you cut, brace the remaining foundation to prevent it from cracking or shifting. Consider hiring a structural engineer to review your plans if you’re unsure about this step. And remember, concrete dust is no joke. Wear a mask and goggles, and work in a well-ventilated area. After the cut, remove the section carefully, as it’s likely heavy and unwieldy.
Step 6: Install the Door Frame
With your opening ready, it’s time to frame it out. Use pressure-treated wood to build a sturdy frame that will support your door. Make sure everything is level and square; even a slight misalignment can cause problems when you hang the door. Double-check all measurements and test-fit the frame before securing it permanently. A poorly aligned frame can lead to operational issues and gaps that let in drafts or water.
Step 7: Waterproof Like Your Basement Depends on It
This step is non-negotiable. Apply a waterproofing membrane around the door frame and install flashing to direct water away from the opening. Consider adding a drain or gravel bed at the base of the door for extra protection. Remember, water damage can undo all your hard work, so don’t skimp here. If your yard is prone to heavy rainfall, consider installing additional drainage measures like a French drain or even connecting to your home’s existing drainage system.
Step 8: Hang the Door and Finish the Details
Finally, the moment you’ve been waiting for—installing the door! Secure it to the frame, check that it opens and closes smoothly, and seal any gaps with weatherstripping. Once the door is in place, add the finishing touches: trim, paint, or landscaping to tie the new entrance into your home’s design. Think about adding outdoor lighting or a small landing area to enhance functionality and aesthetics.
Step 9: Celebrate Your Success
Stand back and admire your work. You’ve transformed your basement and added a stunning feature to your home. Take a moment to savor the satisfaction of a job well done. Then invite your friends over to show off your new walkout door—maybe even throw a backyard barbecue to celebrate! This project isn’t just about adding a door; it’s about creating a whole new way to enjoy your home.
Final Thoughts
Installing a walkout basement door is no small feat, but the rewards are more than worth it. With careful planning, the right tools, and a bit of elbow grease, you can create a functional and beautiful new entryway that breathes life into your basement. Think of it as an investment—not just in your home, but in your lifestyle. So, what are you waiting for? Grab that notebook, start planning, and get ready to dig into your next big adventure! The effort you put in today will pay dividends for years to come.