If you’ve ever installed a toilet, you know the importance of making sure it’s level. A wobbly toilet is not only annoying but can cause leaks, ruins flooring, and causes much more frustration. But the solution to this common problem might be simpler than you think: toilet shims. Yes, these little plastic or wooden wedges may not look important, but without them your toilet won’t be installed properly or securely.
This ultimate guide is going to take you deep into toilet shims and what they are, how to use them, and why they are your secret weapon to getting your toilet perfectly level every time.
Good, let’s go! Grab your toolbox!
What Are Toilet Shims?

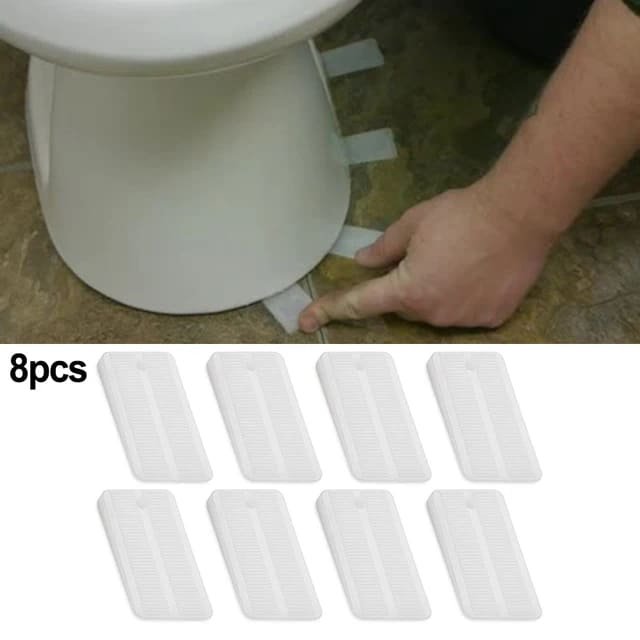
Toilet shims are small, tapered wedges made of plastic, wood, or composite materials. Their purpose is to fill in the gaps between the base of your toilet and the floor, to make sure that your toilet is level and stable. Shims are helpful if your bathroom floor isn’t flat (which, let’s face it, is usually the case), so your toilet won’t rock or move around.
You might be thinking, “Why can’t I just tighten the bolts to fix a wobbly toilet?” Tightening the bolts is part of the process, but shimming is required to prevent the toilet from tilting or moving, especially if the floor the toilet sits on isn’t perfectly level. Shims make sure that your toilet gets a solid, secure base thus putting it firmly in place.
Why Do You Need them?
We’ve all been in that situation, standing in the bathroom, looking at a toilet that seems to tilt when you sit on it. You push it down with your hands, but it rocks back to where it was. This isn’t just uncomfortable, but over time it can damage your toilet’s seal and cause leaks and expensive repairs.
So, here’s why toilet shims are essential:
1. Stability: Toilet shims keep your toilet from moving, so it stays put.
2. Prevent Leaks: A level toilet also keeps a tight seal between the toilet base and the wax ring, reducing the chance of leaks.
3. Protects Your Floor: Shims can also help to secure the toilet in place, preventing pressure on some areas of your floor, which can reduce the chance of cracks or damage.
4. Long-Term Durability: A well-leveled toilet will last longer because it’s not under constant strain from movement or pressure.
5. Better Comfort: The truth is, nobody wants to sit on a toilet that is going to fall over. It’s just more pleasant to use a stable toilet!
Types of Toilet Shims
Before we get into the nitty-gritty of how to use toilet shims, let’s take a moment to talk about the different types of shims you can use:
Plastic Shims: They are the most common and widely available. Durable, waterproof, and easy to slide into place, plastic shims are a great option. They are especially great for bathrooms with tile floors because they won’t absorb water and don’t swell over time.
Wooden Shims: For those who prefer a more traditional or eco-friendly solution, wooden shims are an option. If they need to be cut to fit, they can be cut accordingly. However, they will absorb moisture if left out in water for too long, so they are not ideal for bathrooms with high humidity or wet floors.
Composite Shims: Another newer type of shims are the composite shims, made from a mix of materials that gives you the advantages of both plastic and wooden shims. They are usually tough, moisture resistant, and easy to handle.
When selecting shims for your bathroom, think about the type of flooring in your bathroom and how permanent you want your shims to be. Nevertheless, durability and ease of use make plastic the go-to choice for many people.
How to Use Toilet Shims: A Step-by-Step Guide
Now that we know the basics, we’ll go through the process of using toilet shims to level your toilet. Don’t worry; we’ll break it down so you can feel confident the entire time.
1. Gather Your Tools
Before you start, make sure you have everything you need:
- Plastic or wooden toilet shims, your choice.
- Adjustable wrench
- Level
- Screwdriver
- Wax ring (if you’re replacing it)
2. Remove the Toilet
If you’re working on an existing toilet, which is already installed, the first thing to do is remove the toilet from its base. Here’s how:
First, you turn off the water supply to your toilet and flush to empty the tank. Disconnect and remove the water line from the toilet tank.
Unscrew the toilet bolts which hold the toilet to the floor. Then, lift the toilet off the flange (the pipe connecting the toilet to the drain) and set it to the side. You may need a helper here!
3. Inspect the Floor and Flange
Before adding new shims, look at the floor and flange. The flange should be level and in good condition. If your flange is damaged, it will have to be replaced before you shim the toilet. In addition, make sure there is no old wax ring remnants, or any debris, which could affect the new installation.
4. Place the Shims
The fun part is now shimming! Here’s what you’ll need to do:
Place the toilet back over the flange, gently setting it down on the floor.
The level can be used to check which side of the toilet needs adjusting. Now wherever the toilet is tilting or rocking, you’ll want to put shims under those areas. Put shims between the toilet base and the floor, pushing them in gradually until the toilet is level. This may take a few tries, but be patient; you’ll know you’ve got it when the toilet feels solid and stable.
If you’re using wooden shims, you may need to trim them to fit. To make the adjustments, just use a utility knife or scissors. Once the toilet is level; then check the level again to make sure it is accurate.
5. Secure the Toilet
Once your toilet is level and stable, it’s time to tighten everything up:
Firstly, Tighten the bolts that hold toilet to the floor. Don’t over tighten, or you can crack the toilet base.
If you’ve used plastic shims, they should stay where you put them. Wooden or composite shims may need to be secured in place with a little adhesive, but most plastic shims won’t need this.
Turn the water supply back on, and reconnect the water line.
6. Test for Stability
Now, take a seat (literally). Make sure the toilet is firmly in place and doesn’t rock or shift, and gently press down on the toilet. Congrats if it feels secure! Congratulations, you’ve successfully shimmed your toilet.
Final Thoughts: A Level Toilet is Important.
While it may seem like a trivial detail in the world of home improvement, leveling a toilet can actually make a big difference in the comfort and long life of your bathroom. A properly shimmed toilet not only prevents leaks and floor damage but also prevents the frustration of a wobbly toilet that just never seems right.
If you’re ever stuck with a wobbly toilet, next time remember a few shims could be the quick and easy fix you need. You can level your toilet like a pro with a little patience and the right tools, and that’s something to celebrate.
Shimming away happy, may your bathroom always be as stylish as it is stable!


