
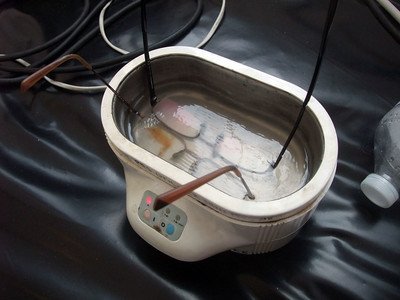
If you’ve ever seen an ultrasonic cleaner and wondered, “How does this magic box work?”, or “Can this thing really clean all these things so effortlessly?” you’re not alone.
If you haven’t used one yet, let me tell you, you’re missing out on one of the most satisfying cleaning tools out there. Well these unique cleaning machines, use high frequency sound waves to create tiny bubbles in a liquid and then clean the grime and dirt off of items without any scrubbing. It’s like a little mini spa day for your stuff!
We’ll show you how to use ultrasonic cleaners to clean everything from delicate jewelry to tough automotive parts.
How to Use Ultrasonic Cleaners to Clean Jewelry?
Have you ever looked at your favorite ring or necklace and thought, “It’s lost its sparkle?”. Well, over time, jewelry, especially the ones we wear daily, can collect dirt, oils and even lotions. Ultrasonic cleaners can bring back their original shine without you spending hours polishing them.
How it works:
1. First of all, look closely at your jewelry. Are there loose stones, broken clasps or any other damage? If so, ultrasonic cleaning might not be the best route, as it could make the problem worse. However, for sturdy things such as wedding bands, diamond earrings and solid bracelets ultrasonic cleaning is like a charm.
2. Put warm water into the tank of the ultrasonic cleaner until your jewelry is just covered. Drop in a little bit of a gentle cleaning solution, but if you only have a tiny dab of mild dish soap, that will work, too.
3. Put your jewelry in the basket and make sure the pieces don’t touch or overlap. For about 3 to 5 minutes, set the timer. When the machine begins to hum, you’ll begin to see tiny bubbles forming.
4. When you’re done with the cycle, take the jewelry out carefully. Then rinse it under running clean water to remove any loosened debris, or leftover cleaning solution. Lastly, pat it dry with a soft microfiber cloth.
What to Watch Out For: Just a heads up, with softer gemstones such as pearls or opals, be careful—they’re fragile and can be damaged. But diamonds, gold, and silver love this process.
Why You’ll Love It: Once you turn it on, the machine’s vibrations will dislodge even the tiniest dirt stuck in the crevices. Your jewelry will in fact look like it just stepped out of a professional jeweler’s shop. Well, sparkle is not the only thing here – it’s about bringing back the sentimental value of your pieces. For whatever reason, cleaning your jewelry in an ultrasonic cleaner feels almost ceremonial and you’re subconsciously honoring the memories that it holds within.
Using Ultrasonic Cleaners for Eyeglasses:
If you wear eyeglasses, you know how annoying it is to have to keep wiping smudges, dust and grime off of them. Those little nooks around the hinges and frames, no matter how often you clean them, seem impossible to reach. Well, ultrasonic cleaners come in handy here. For anyone who’s tired of staring through less-than-clear lenses, they’re a game changer.
How It Works:
1. First, inspect your glasses. The vibrations generated by ultrasonic cleaners may not be good for some coatings. However, if you have standard lenses and sturdy frames, you’re good to go.
2. Put a drop or two of mild dish soap in the tank, and fill with water. A gentle solution is important, because anything too strong could damage the lenses or frames. Place the glasses into the basket, so that they don’t touch the sides or bottom of the tank.
3. Turn on the cleaner and let it do its thing for a few minutes. The generated sound waves pass through even the tiniest of crevices and cleans screws, hinges and difficult to reach spots.
4. Chances are when the cycle finishes, you don’t actually get the glasses clean because that soapy liquid is still clinging to them. Therefore dry them using a microfiber cloth, making sure to buff the lenses gently. This is after the process, and putting on your glasses feels as if you have upgraded to high definition vision.
A Bonus Tip: If the lenses are removable, remove them so as not to do potential damage. Also check with your optometrist always, if your glasses have coatings that may not react well to ultrasonic cleaning.
Why You’ll Love It: You’ll notice that even the tiniest debris hiding around the hinges is gone when you take them out. Your lenses will be spotless and your frames will feel fresh and new.
Cleaning Makeup Brushes with Ultrasonic Cleaners
If you’ve been guilty of neglecting your makeup brushes (and we’ve all been there), raise your hand. Of course, it’s important to clean them regularly, but who wants to wash brushes by hand? Here, ultrasonic cleaners can save the day.
The ultrasonic vibrations break down dried makeup, oils and bacteria from bristles without damaging them. Hence these ultrasonic machines are game changers when it comes to cleaning your makeup brushes.
How to Do It:
1. Put warm water into your tank and add a very gentle shampoo or brush cleaning solution. Keep the brush heads in the water such that their handles stay above water in order to avoid damage.
2. With that set, let the ultrasonic waves break down stubborn makeup residue, oils and dirt.
3. Later, brushes should be rinsed under running water and reshaped and allowed to air dry.
Why You’ll Love It: Once you’ve cleaned, your brushes will be softer and ready to apply makeup to perfection. Almost like giving your tools a fresh start!
Reviving Coins and Collectibles with Ultrasonic Cleaners
This one’s for collectors. Ultrasonic cleaners can clean old collectibles back to their original state, whether they are coins, stamps or small figurines.
How it works:
1. Remember, not all coins are the same. Coins from older times or having some special finishes may not be the right candidates for ultrasonic cleaning. So before you dive in, always research your item’s material because preserving its value should be your top priority.
2. Put distilled water in the ultrasonic cleaner. Sometimes tap water leaves mineral deposits, so it’s best to avoid it. Then add a gentle solution, specifically designed for cleaning coins.
3. Put the coins in the cleaner’s basket, while ensuring they aren’t overlapping. Now the ultrasonic waves will do their job for a few minutes; then check the coins. Repeat process if necessary for specially stubborn tarnish.
4. Take the coins, rinse them with distilled water, and pat the coins dry with a soft cloth.
A Word of Caution: For vintage items, or fragile coins, test a small spot first to see if the cleaner will strip their natural patina or finish.
Why You’ll Love It: The tarnished coins and dusty trinkets will look remarkably better. You will now be amazed by their original details!
Using Ultrasonic Cleaners for Vintage Vinyl Records
We’ve all been there: vinyl enthusiasts know the heartbreak of hearing a beloved record skip due to dust or grime. Those grooves can be brought back to life with ultrasonic cleaners.
How It’s Done:
1. Only distilled water at room temperature should be used.
2. Support the record properly in the cleaner (never let it sit flat!)
3. Run for no more than 1 minute
4. Once it is finished, immediately and thoroughly dry with a micro fiber cloth.
Why It Works: The small bubbles softly remove dirt and debris from the grooves without harming the delicate plastic surface of the record.
Why You’ll Love It: Once cleaned, you’ll hear a crisper, clearer sound quality – it’s almost like listening to the record for the first time all over again.
Removing Rust from Tools and Automotive Parts
Rusty tools or car parts lying around? Rather than scrubbing them endlessly, leave it to ultrasonic cleaners.
How it works:
1. Before you put it in the cleaner, scrape off the loose dirt or rust. Also, be sure not to attach electrical components to the parts you’re cleaning.
2. Use a cleaning solution specially suitable for metal parts. The ultrasonic waves gradually and effortlessly remove the rust, grease and grime from the surface of the tools.
3. Once cleaning is done, rinse and dry all the things really well to prevent more rusting fruther.
The Secret Weapon: Pour a rust remover or degreaser solution into the cleaner, place the items in and let it do its thing.
Why You’ll Love It: Rust, oil and grime will be stripped away, leaving your tools looking almost new. This is a no sweat way to restore functionality.
Making Silverware Shine Again:
Imagine you are hosting a dinner party tonight and you suddenly found all your silverware completely tarnished. It would be a real nightmare, right? Fortunately, ultrasonic cleaners are great for polishing such silver utensils.
How It Works:
1. Fill in with warm water and add a gentle silver cleaning solution.
2. Carefully arrange all the pieces such that they don’t scratch each other.
3. Run for 3-4 minutes.
4. Hand dr with a soft cloth immediately.
What to Know: Don’t mix metals during cleaning to avoid discoloration.
Why You’ll Love It: Even the most discerning dinner guest will be impressed by seeing your silverware shining bright.
Why Everyone Needs an Ultrasonic Cleaner?
It feels almost therapeutic to use an ultrasonic cleaner. It’s oddly satisfying to watch dirt lift away and see your items come out refreshed and revitalized. An ultrasonic cleaner is a practical tool for your household chores or a savior for your prized possessions, and it really lives up to the hype.
Now’s the time if you haven’t tried one yet. Trust me, you’ll never look at cleaning the same way again.